The Crochet Crowd

  • PATTERNS
  • STITCH ALONGS
  • TUTORIALS & STITCHES
  • COMMUNITY & EVENTS
  • ABOUT
menu icon
go to homepage
  • PATTERNS
  • STITCH ALONGS
  • TUTORIALS & STITCHES
  • COMMUNITY & EVENTS
  • ABOUT
    • Facebook
    • Instagram
    • YouTube
  • search icon
    Homepage link
    • PATTERNS
    • STITCH ALONGS
    • TUTORIALS & STITCHES
    • COMMUNITY & EVENTS
    • ABOUT
    • Facebook
    • Instagram
    • YouTube
  • ×
    Home » Crochet Clothing Patterns

    How to Join Panels for Garments Photo Tutorial

    Sharing is caring!

    • Facebook
    • Email

    Are you making a clothing garment with panels to sew together? The schematics can be confusing, and below is a photo tutorial on what they look like and how to dissect them.

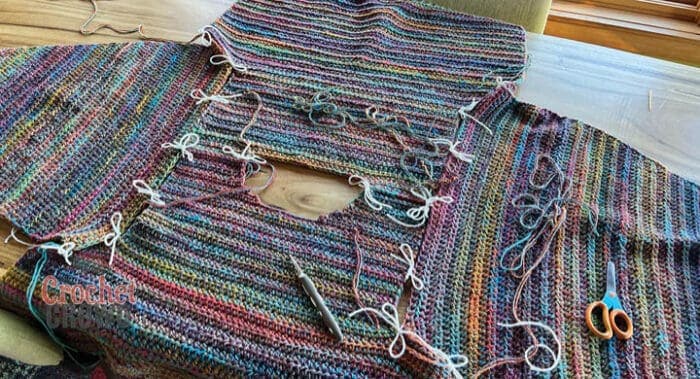
    For joining panels, I use whip stitching. I use stitch markers, aka yarn, to tie bow tie knots to hold the panels together so they can evenly sew.

    Joining the Panels with Stitch Markers to Hold
    Joining the panels with stitch markers holding the panels together so I could sew evenly across the edges. This is showing Option B.
    Colorful striped crochet sweater showcasing garment assembly instructions.
    Both Options for joining are shown here. The beautiful woman is wearing option 1 and Mikey is wearing option 2. Can you tell the difference?

    Both free patterns are available:

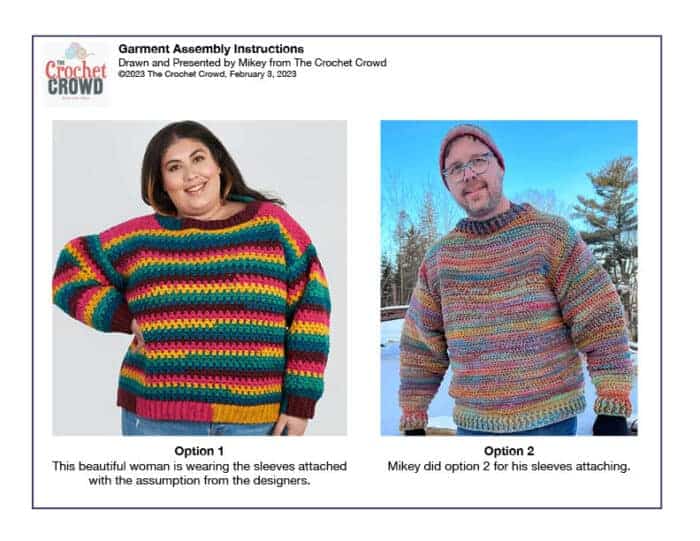
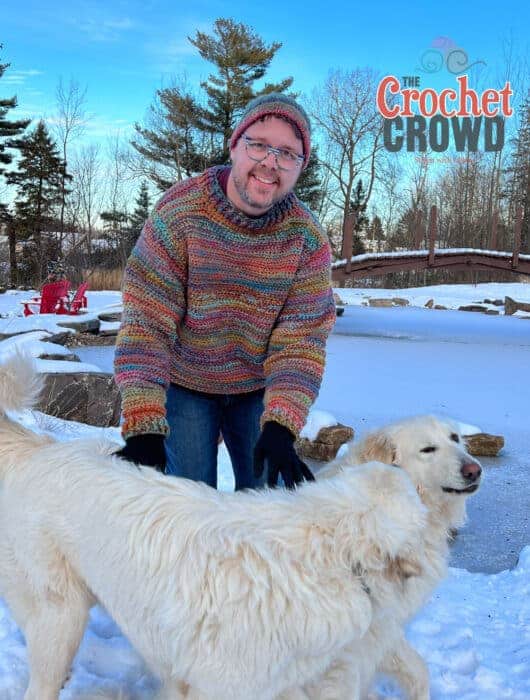
    The beautiful woman wearing the sweater, the sweater is called Party People Crochet Pullover. Mikey's sweater is Men's Pullover Sweater.

    How to Whip Stitch


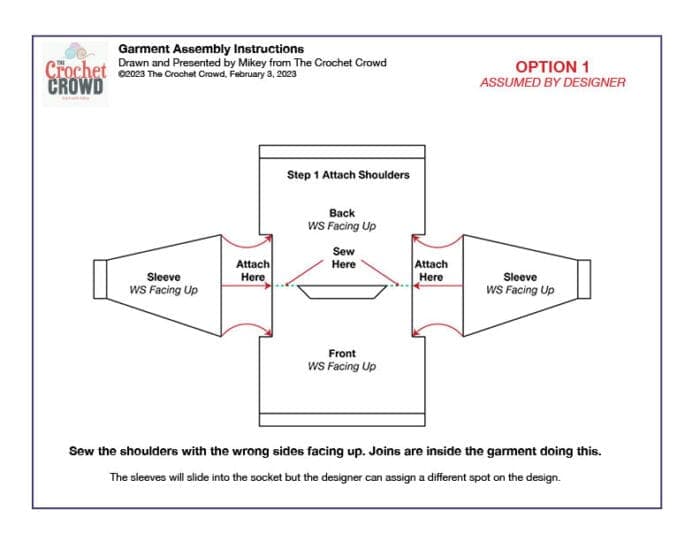
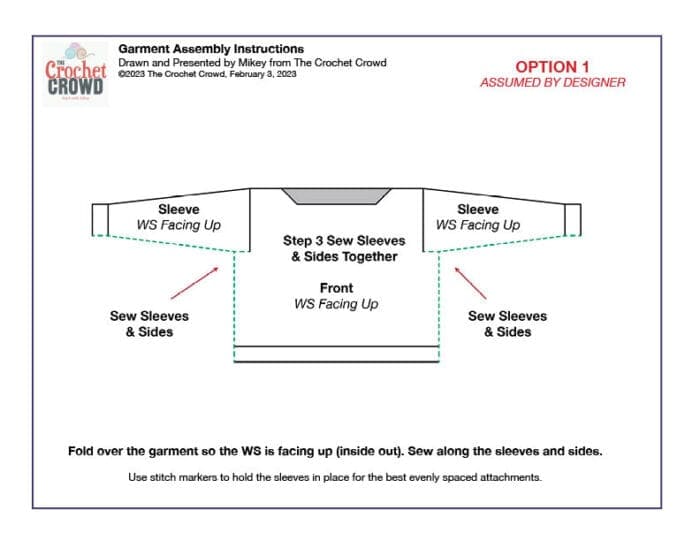
    Option 1 - Assumed by Designers

    The designers will show a schematic of what the panels of the garment will look like. In this format, the panels are flat. Many designers put the front and back overlaid with each other to save paper space.

    In the schematic below, I placed the gray in the neckline to show you the back panel is only visible there when they are overlaid.

    Attaching Diagrams for Garments
    Attaching Diagrams for Garments

    When you are ready to attach. Place the garment panels with the wrong side (WS) facing up. This will case the sewing to be on the inside of the garment. Attach the shoulders together as step 1.

    Attaching Diagrams for Garments - Sewing Shoulders
    Attaching Diagrams for Garments - Sewing Shoulders

    The sleeves are sewn into the flat area inside the indent area. Use the stitch markers to hold them into position as sometimes the sleeves me slightly a different size.

    See the picture of the colourful sweater showing you that the sleeve is squared off in the indent when it's sewn into position.

    Attaching Diagrams for Garments - Attaching Sleeves
    Attaching Diagrams for Garments - Attaching Sleeves

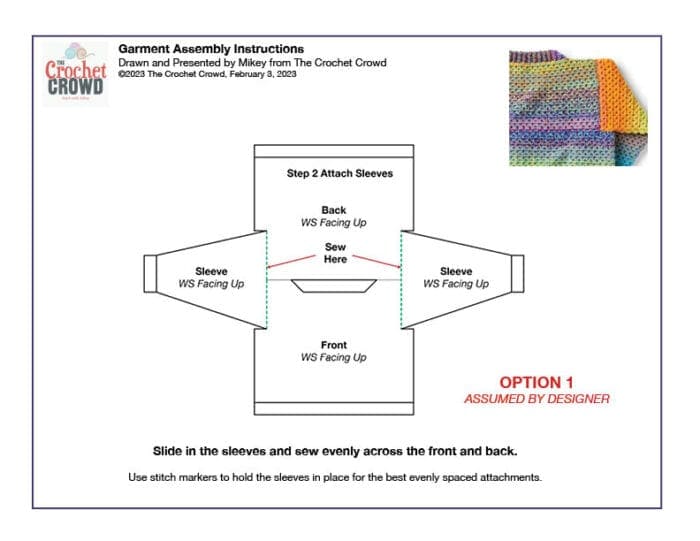
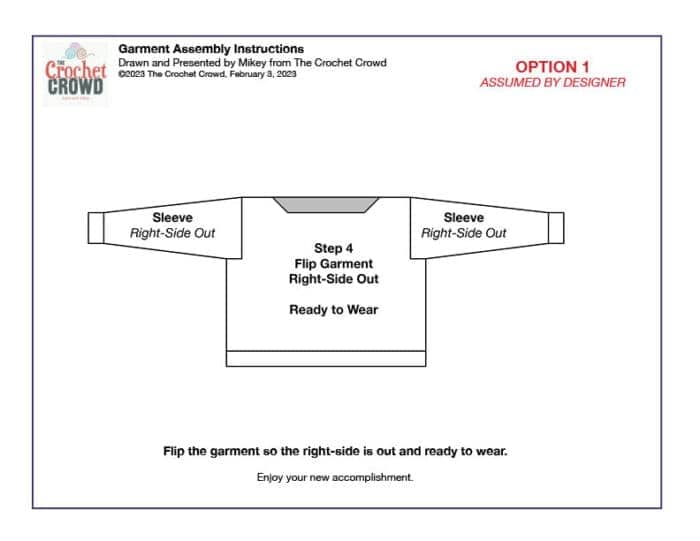
    Fold the front and back panels over top of each other so the wrong side (WS) is facing up. That's inside out.

    Attaching Diagrams for Garments - Sewing Sleeves and Sides Closed
    Attaching Diagrams for Garments - Sewing Sleeves and Sides Closed

    Turn the garment right-side out as if you were going to wear it out in public. All of the seams you did will be inside the garment. The sleeves will look squared off in this format.

    Attaching Diagrams for Garments - Ready to Wear
    Attaching Diagrams for Garments - Ready to Wear

    Option 2 - Contouring the Turn

    For Mikey's sweater, through lack of information but having seen it done before, he contoured the corners by joining the sleeve at the outside of the panel and forced the sleeve to make the 90-degree turn. While it bunches up sitting flat, our bodies are not flat and it contours under the arm. If the designer wants this, they will highlight it in the pattern. Assume option 1 unless the designer says differently.

    Sew the shoulders together but look where the sleeves will be attached for option 2.

    Attaching Diagrams for Garments Attaching for Contouring
    Attaching Diagrams for Garments Attaching for Contouring

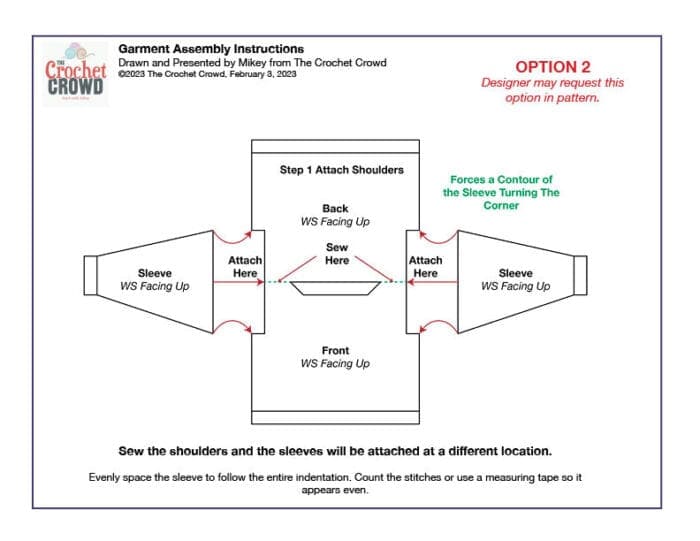
    Using stitch markers, evenly space the sleeve from the edge and force the sleeve on the small indent to make the 90-degree turn. This will pull the 90-degree turn to be rounded off in appearance.

    Attaching Diagrams for Garments - Contoured Joining
    Attaching Diagrams for Garments - Contoured Joining

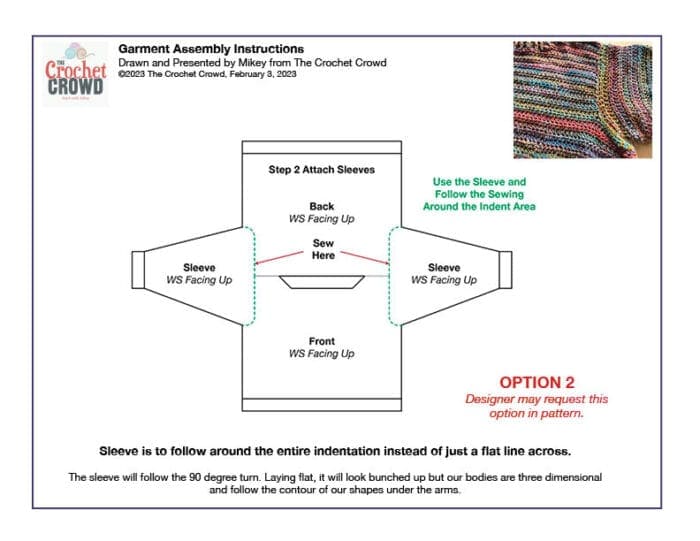
    The sleeves will have a contoured look based on the last step. You just have to sew the remaining of the sleeve and side edge on both sides to finish.

    Attaching Diagrams for Garments - Sew Sleeves and Sides Together
    Attaching Diagrams for Garments - Sew Sleeves and Sides Together

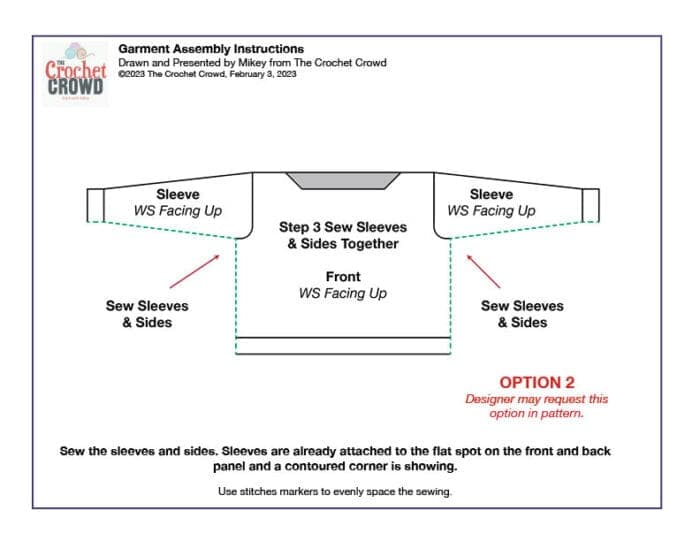
    Flip the garment right-side out so it's ready to wear out. You will notice the sleeves will appear in this format with Option 2.

    Attaching Diagrams for Garments - Ready to Wear
    Attaching Diagrams for Garments - Ready to Wear

    Can You Tell the Difference?

    Mikey's sweaters were joined with Option B as he thought it was the right way to do it. However, he saw this before and thought it was the right way. However, the designer's assumption is Option 1 if it's not told any differently.

    Mikey's Crochet Sweater at The Pond
    Mikey's Crochet Sweater at The Pond

    More Clothing Patterns

    [the_grid name="Clothing"]

    Like this:

    Like Loading...

    Related

    More Crochet Clothing

    • How to Crochet Beginners Hexagon Cardigan + Tutorial
    • Crochet Unicorn Waffle Wedge Scarf Pattern + Tutorial
    • 2 Crochet Top Stitch Alongs by The Crochet Crowd
    • Crochet Swept Stitch Scarf + Crochet Diagram

    Filed Under: Crochet Clothing Patterns, Crochet Wearable Tutorials

    Comments

      Have you completed this project. Show me! Cancel reply

      Your email address will not be published. Required fields are marked *

      The maximum upload file size: 360 MB. You can upload: image, document. Links to YouTube, Facebook, Twitter and other services inserted in the comment text will be automatically embedded. Drop file here

    1. Jennifer says

      February 10, 2023 at 7:16 pm

      Comparing the two methods of joining set in sleeves was very helpful. It's a subtle difference when looking at the pattern but the wearability of option 2 is greatly increased over option 1. I prefer set in sleeves rather than the drop sleeve style even though it is in vogue right now. And, it is a bit more involved to join but worth the effort. Learning day by day.

      Reply
    Mikey Blogging with Pen In Hand

    Welcome!

    I'm Mikey, join me in learning crochet as I am always learning, too!

    More about me
    Mikey Stitch Studio Browse Patterns
    • 6 Crochet Messy Bun Hat Patterns
    • Crochet Bright Future Blanket Pattern + Tutorial
    • Ready to Book - COCO DuMore Two Crochet Cruises February 2027
    • Free Caron Crochet Hugs & Kisses Starshine Blanket Pattern + Tutorial
    • Free Caron How To Crochet Super Star Baby Blanket
    • Crochet Parting Ways Blanket Pattern + Diagram
    • Free Study of Therapy Crochet Blanket Pattern + Diagram
    • Free Bernat Housewarming Blanket + Tutorial + Crochet Diagrams
    • Stitches & Glaciers Crochet Cruise July 10th to 17th, 2026
    • Crochet Orbs Blanket Pattern with Crochet Diagrams
    • Crochet Study of Variegated Blanket Pattern + Tutorial
    • Crochet Blizzard Snowflake Afghan Pattern + Tutorial
    • Crochet Study of Puffed Dessert Blanket
    • New Warped Tunisian Entrelac Online Workshop + Tutorials
    See more Crochet Stitch Along Patterns →

    Footer

    Stitch Alongs With Mikey

    • How To Crochet Study of Snow Blanket + Tutorial
    • How To Crochet Study of Transitions Blanket Pattern + Tutorial
    • The Study of Ombre Crochet Afghan
    • Bernat Study of Reality Crochet Blanket Stitch Along + Tutorial
    • Study of Snow Days with Hot Chocolate Crochet Blanket Stitch Along + Tutorial
    See more Crochet Stitch Along Patterns →
    ↑ back to top

    Explore

    • About
    • Before 2023
    • 2023 Patterns
    • 2024 Patterns
    • 2025 Patterns
    • 2026 Patterns

    More

    • FAQ
    • Contact
    • Privacy Policy

    The website has been active since 2010. Articles and patterns are reviewed from time to time. Some patterns get updated with newly written instructions, photography and keeping the patterns current.

    Copyright © 2026 The Crochet Crowd • Some links may contain affiliate connections.

    %d