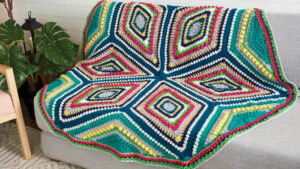
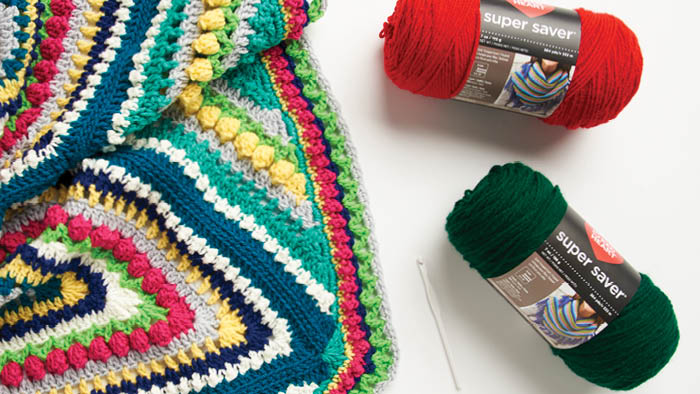
The Crochet Study of Geometry is the next study blanket in Mikey's Design collection. Mixed with texture and techniques that may leave you intrigued on how it is done.
There will be 5 generous yarn prizes available for this Stitch Along at the end of the season.
This blanket design is considered an intermediate level.
Yarn
Red Heart® Super Saver® (198 g/7 oz; 333 m/364 yds)
- Contrast A - Light Grey (0341) - 1 ball or 306 m/335 yds
- Contrast B - Real Teal (0656) - 1 ball or 318 m/348 yds
- Contrast C - Lemon (0235) - 1 ball or 270 m/295 yds
- Contrast D - Soft Navy (0387) - 1 ball or 234 m/256 yds
- Contrast E - Soft White (0316) - 1 ball or 298 m/326 yds
- Contrast F - Spring Green (0672) - 1 ball or 209 m/228 yds
- Contrast G - Shocking Pink (0718) - 1 ball or 226 m/247 yds
- Contrast H - Jade (3862) - 1 ball or 258 m/285 yds
Sizing
- Blanket is 60" across point to point.
- Size U.S. I/9 (5.5 mm) crochet hook or size needed to obtain gauge. Stitch markers
- 13 sc and 14 rows = 4" [10 cm].
Abbreviations
- Approx = Approximate(ly)
- Beg = Begin(ing)
- Ch = Chain(s)
- Dscp = (Diamond corner sharp point). (2 dc. 1 tr. Ch 1. 1 tr. 2 dc) all in ch-1 sp (Corner Point)
- Dc = Double crochet
- Dtr = Double treble crochet
- Hdc = Half double crochet
- Popcorn = 5 dc in indicated stitch. Drop loop from hook. Re-insert hook from front to back into first dc of 5-dc group. Pull dropped loop through stitch. Ch 1 to close Popcorn
- PM = Place marker
- Rep = Repeat
- Rem = Remain(ing)
- Rnd(s) = Round(s)
- RS = Right side
- Sc = Single crochet
- Sl st = Slip stitch
- Sp(s) = Space(s)
- St(s) = Stitch(es)
- Tr = Treble crochet
- V-st = (1 dc. Ch 2. 1 dc) in indicated stitch
- WS = Wrong side
Notes
- Ch 4 at beg of rnds counts as dc and ch 1.
- To join all rnds with sl st to 3rd ch of ch-4.
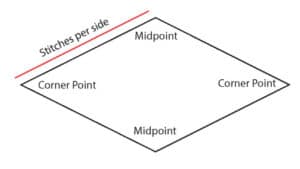
- Use stitch marker to indicate Corner Points and Midpoint corners. Move markers as work progresses.
- To save time, weave in ends as you go.
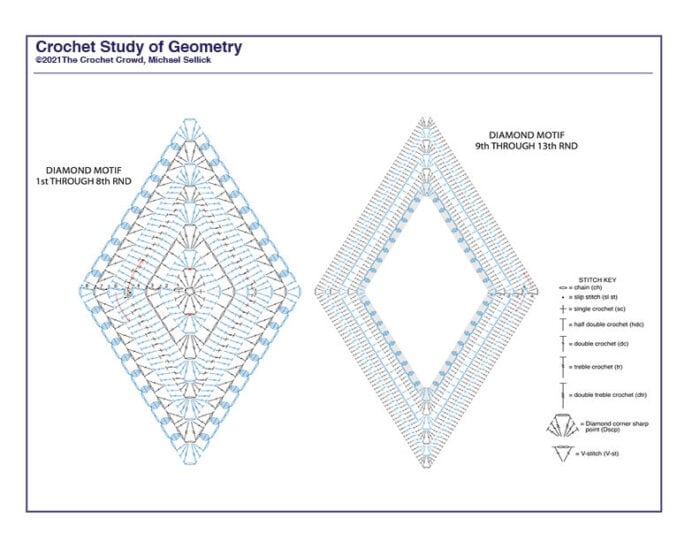
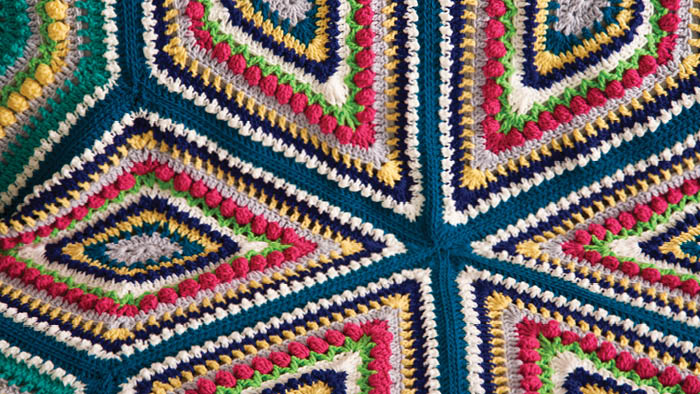
Diamonds
With A, ch 4. Join with sl st to to form a ring.
1st rnd: (RS). Ch 1. (1 sc. 1 hdc. 1 dc. 1 tr) all in ring. Ch 1. PM on last ch-1 for first Corner Point. (1 tr. 1 dc. 1 hdc. 1 sc. 1 hdc. 1 dc. 1 tr) all in ring. Ch 1. PM on last ch-1 sp for second Corner Point. (1 tr. 1 dc. 1 hdc) all in ring. Join with sl st to first sc. 14 sts and 2 ch-1 sps (corner points).
2nd rnd: Ch 4 (counts as dc and ch-1 sp here and throughout). 1 dc in same sp as sl st. PM on 3rd ch of ch-4 for Midpoint. *1 dc in each of next 3 sts. Dscp. Move marker to ch-1 sp for Corner Point. 1 dc in each of next 3 sts.* (1 dc. Ch 1. 1 dc) in next sc. PM on last ch-1 for Midpoint. Rep from * to * once more. Join. Fasten off A. 7 sts between Corner Point and Midpoint ch-1 sps. Markers for 2 Corner Points and 2 Midpoints are in position. Move markers as work progresses.
3rd rnd: Join B with sl st to first Midpoint ch-1 sp. Ch 4. 1 dc in same sp as sl st. *Ch 1. Skip next dc. (1 dc in next dc. Ch 1. Skip next st) 3 times.** Dscp. Rep from * to ** once more.* (1 dc. Ch 1. 1 dc) in next Midpoint ch-1 sp. Rep from * to * once more. Join. Fasten off B. 11 sts between ch-1 sps.
4th rnd: Join C with sl st to first Midpoint ch-1 sp. Ch 4. 1 dc in same sp as sl st. *1 dc in each st and ch-1 sp to Corner Point ch-1 sp.** Dscp. Rep from * to ** once more.* (1 dc. Ch 1. 1 dc) in next Midpoint ch-1 sp. Rep from * to * once more. Join. Fasten off C. Turn. 15 sts between ch-1 sps.
5th rnd: (WS). Join D with sl st to Midpoint ch-1 sp. Ch 1. (1 sc. Ch 1. 1 sc) in same sp as sl st. *1 tr in next st, pushing post of tr to back of work. (1 sc in next st. 1 tr in next st) 7 times. (2 hdc. 1 dc. Ch 1. 1 dc. 2 hdc) in Corner Point ch-1 sp. 1 tr in next st. (1 sc in next st. 1 tr in next st) 7 times.* (1 sc. Ch 1. 1 sc) in next Midpoint ch-1 sp. Rep from * to * once more. Join with sl st to first sc. Fasten off D. Turn. 19 sts between ch-1 sps.
6th rnd: (RS). Join E with sl st to first Midpoint ch-1 sp. Ch 4. 1 dc in same sp as sl st. *1 dc in each st to Corner Point ch-1 sp. (2 dc. 1 tr. 1 dtr. Ch 1. 1 dtr. 1 tr. 2 dc) in Corner Point ch-1 sp. 1 dc in each st to Midpoint ch-1 sp.* (1 dc. Ch 1. 1 dc) in next Midpoint ch-1 sp. Rep from * to * once more. Join. Fasten off E. 24 sts between ch-1 sps.
7th rnd: (RS). Join F with sl st to first Midpoint ch-1 sp. Ch 4. 1 dc in same sp as sl st. *(Skip next 2 sts. V-st in next st) 8 times. (1 dc. Ch 2. 1 tr. Ch 1. 1 tr. Ch 2. 1 dc) in Corner Point ch-1 sp. V-st in next st. (Skip next 2 sts. V-st in next st) 7 times.* (1 dc. Ch 1. 1 dc) in next Midpoint ch-1 sp. Rep from * to * once more. Join. Fasten off F. 28 sts between ch-1 sps.
8th rnd: Join G with sl st to Midpoint ch-1 sp. Ch 4. 1 dc in same sp as sl st. *1 dc in next dc. Ch 1. Popcorn in next ch-2 sp. (Ch 2. Popcorn in next ch-2 sp) 8 times. Ch 1. Dscp. Ch 1. Popcorn in next ch-2 sp. (Ch 2. Popcorn in next ch-2 sp) 8 times. Ch 1. 1 dc in next dc.* (1 dc. Ch 1. 1 dc) in next Midpoint ch-1 sp. Rep from * to * once more. Join. Fasten off G. 32 sts between ch-1 sps. 9 Popcorns per each side.
9th rnd: Join A with sl st to first Midpoint ch-1 sp. Ch 4. 1 dc in same sp as sl st. *1 dc in each of next 2 dc. 1 dc in next ch-1 sp. 1 dc in next Popcorn. (2 dc in next ch-2 sp. 1 dc in next Popcorn) 8 times. 1 dc in next ch-1 sp. 1 dc in each of next 3 sts. Dscp. 1 dc in each of next 3 sts. 1 dc in next ch-1 sp. 1 dc in next Popcorn. (2 dc in next ch-2 sp. 1 dc in next Popcorn) 8 times. 1 dc in next ch-1 sp. 1 dc in each of next 2 dc.* (1 dc. Ch 1. 1 dc) in next Midpoint ch-1 sp. Rep from * to * once more. Join. Fasten off A. 36 sts between ch-1 sps.
10th rnd: Join C with sl st to first Midpoint ch-1 sp. Ch 4. 1 dc in same sp as sl st. * (1 dc in next st. Ch 1. Skip next st) 18 times. Dscp. (Ch 1. Skip next st. 1 dc in next st) 18 times.* (1 dc. Ch 1. 1 dc) in next Midpoint ch-1 sp. Rep from * to * once more. Join. Fasten off C. 40 sts between Corner Point ch-1 sps.
11th rnd: Join D with sl st to first Midpoint ch-1 sp. Ch 4. 1 dc in same sp as sl st. *1 dc in each st and ch-1 sp to Corner Point ch-1 sp.** Dscp. Rep from * to ** to Midpoint ch-1 sp.* (1 dc. Ch 1. 1 dc) in next Midpoint ch-1 sp. Rep from * to * once more. Join. Fasten off D. Turn. 44 sts between ch-1 sps.
12th rnd: (WS). Join E with sl st to first Midpoint ch-1 sp. Ch 1. (1 sc. Ch 1. 1 sc) in same sp as sl st. *(1 sc in next st. 1 tr in next st) 22 times. (2 hdc. 1 dc. Ch 1. 1 dc. 2 hdc) in Corner Point ch-1 sp. (1 tr in next st. 1 sc in next st) 22 times*. (1 sc. Ch 1. 1 sc) in Midpoint ch-1 sp. Rep from * to * once more. Join with sl st to first sc. Fasten off E. Turn. 48 sts between ch-1 sps.
13th rnd: (RS). Join B with sl st to first Midpoint ch-1 sp. Ch 4. 1 dc in same sp as sl st. *1 dc in each st to Corner Point ch-1 sp.** Dscp. Rep from * to ** once more.* (1 dc. Ch 1. 1 dc) in next Midpoint ch-1 sp. Rep from * to * once more. Join. Fasten off. 52 sts between ch-1 sps. Note: Motif should be approx 27" [69 cm] long x 16" [41 cm] wide.
Crochet Diamond Diagram
Click on diagram to save or print.
Join Diamond Motifs Together
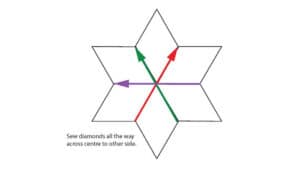
Join Diamonds tog: Cut strand of B 94" [234 cm] long. Sew Motifs tog, using whip stitch along with back loops starting at a midpoint corner from one side jumping over to center point to attach other two triangles across at the same time. This will help pull in the center points to have a beautiful closed look in the centre.
Crochet Triangle Motifs
Notes
- Ch 3 at beg of row counts as dc.
- Ch 4 at beg of row counts as tr.
With H, ch 4. Join with sl st to beg ch to form ring.
1st row: (WS). Ch 4. (1 tr. 1 dc. 1 hdc. 1 sc. 1 hdc. 1 dc. 2 tr) in ring. Turn. 9 sts.
2nd row: (RS). Ch 4. (1 tr. 2 dc) in first st. 1 dc in each of next 3 sts. (1 dc. Ch 1. 1 dc) in next sc. PM on last ch-1 sp made for Midpoint ch-1 sp 1 dc in each of next 3 sts. (2 dc. 2 tr) in last stitch. Turn. 8 sts at each side. Marker for Midpoint is established. Move marker as work progresses.
3rd row: Ch 4. (1 tr. 2 dc) in first st. *Ch 1. Skip next st. (1 dc in next st. Ch 1. Skip next st) 3 times.* (1 dc. Ch 1. 1 dc) in next Midpoint ch-1 sp. Rep from * to * once more. (2 dc. 2 tr) in last st. Turn. 12 sts (dc and ch-1 sps) at each side.
4th row: Ch 4. (1 tr. 2 dc) in first st. *1 dc in each st and ch-1 sp to corner ch-1 sp.* (1 dc. Ch 1. 1 dc) in next Midpoint ch-1 sp. Rep from * to * once more. (2 dc. 2 tr) in last st. Turn. 16 sts at each side.
5th row: Ch 3. (1 dc. 2 hdc) in first st. 1 tr in next st. (1 sc in next st. 1 tr in next st) 7 times. (1 sc. Ch 1. 1 sc) in next Midpoint ch-1 sp. 1 tr in next st (1 sc in next st. 1 tr in next st) 7 times. (2 hdc. 2 dc) all in last st. Break H. Turn. 20 sts at each side.
6th row: Join A with sl st to first st. Ch 5 (counts as dtr). (1 dtr. 1 tr. 2 dc) in first st. 1 dc in each st to next corner ch-2 sp. (1 dc. Ch 1. 1 dc) in next Midpoint ch-1 sp. 1 dc in each st to last st. (2 dc. 1 tr. 2 dtr) in last st. Break A. Turn. 25 sts at each side.
7th row: Join F with sl st to first st. Ch 4. (1 tr. Ch 2. 1 dc) in first st. V-st in next st. (Skip next 2 sts. V-st in next st) 7 times. (1 dc. Ch 1. 1 dc) in next Midpoint ch-1 sp. (Skip next 2 sts. V-st in next st) 8 times. (1 dc. Ch 2. 2 tr) in last st. Break F. Turn. 29 sts at each side.
8th row: Join C with sl st to first st. Ch 4. (1 tr. 2 dc) in first st. Ch 1. Popcorn in next ch 2 sp. (Ch 2. Popcorn in next ch-2 sp) 8 times. Ch 1. 1 dc in last dc. (1 dc. Ch 1. 1 dc) in next Midpoint ch-1 sp. 1 dc in next dc. Ch 1. Popcorn in next ch-2 sp. (Ch 2. Popcorn in next ch-2 sp) 8 times. Ch 1. (2 dc. 2 tr) in last st. Break C. Do not turn. 33 sts at each side.
9th row: (RS). Join A with sl st to first st. Ch 4. (1 tr. 2 dc) in first st. 1 dc in each of next 3 sts. 1 dc in next ch-1 sp. 1 dc in next Popcorn. (2 dc in next ch-2 sp. 1 dc in next Popcorn) 8 times. 1 dc in next ch-1 sp. 1 dc in each of next 2 dc. (1 dc. Ch 1. 1 dc) in next Midpoint ch-1 sp. 1 dc in each of next 2 dc. 1 dc in next ch-1 sp. 1 dc in next Popcorn. (2 dc in next ch-2 sp. 1 dc in next Popcorn) 8 times. 1 dc in next ch-1 sp. 1 dc in each of next 3 sts. (2 dc. 2 tr) in last st. Break A. Turn. 37 sts at each side.
10th row: Join H with sl st to first st. Ch 4. (1 tr. 2 dc) in first st. (Ch 1. Skip 1 st. 1 dc in next st) 18 times. (1 dc. Ch 1. 1 dc) in next Midpoint ch-1 sp. 1 dc in next st. (Ch 1. Skip 1 st. 1 dc in next st) 17 times. Ch 1. Skip next st. (2 dc. 2 tr) in last st. Turn. 41 sts at each side.
11th row: Ch 4. (1 tr. 2 dc) in first st. *1 dc in each st and ch sp to corner.** (1 dc. Ch 1. 1 dc) in next Midpoint ch-1 sp. Rep from * to ** once. (2 dc. 2 tr) in last st. Break. Turn. 45 sts at each side.
12th row: Join E with sl st to first st. Ch 3. (1 dc. 2 hdc) in first st. (1 tr in next st. 1 sc in next st) 22 times. (1 sc. Ch 1. 1 sc) in next Midpoint ch-1 sp. (1 sc in next st. 1 tr in next st) 22 times. (2 dc. 2 tr) in last st. Break. Turn. 49 sts at each side.
13th row: Join B with sl st to first st. Ch 4. 2 dc in first st. *1 dc in each st to Midpoint ch-1 sp.** (1 dc. Ch 1. 1 dc) in next Midpoint ch-1 sp. Rep from * to ** once. (2 dc. 1 tr) in last st. Fasten off. 52 sts at each side.
Crochet Triangle Diagram
Click on diagram to save or print.
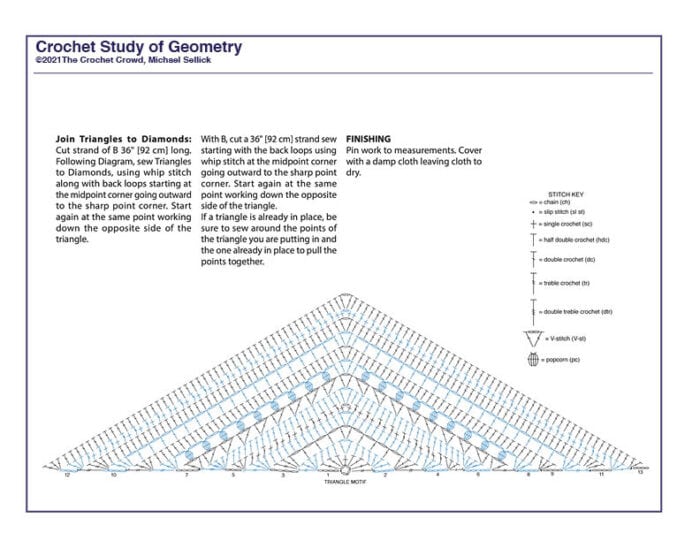
Join Triangles to Diamonds
Join Triangles to Diamonds: Cut strand of B 36" [92 cm] long. Following Diagram, sew Triangles to Diamonds, using whip stitch along with back loops starting at the midpoint corner going outward to the sharp point corner. Start again at the same point working down the opposite side of the triangle.
With B, cut a 36" [92 cm] strand sew starting with the back loops using whip stitch at the midpoint corner going outward to the sharp point corner. Start again at the same point working down the opposite side of the triangle. If a triangle is already in place, be sure to sew around the points of the triangle you are putting in and the one already in place to pull the points together.
Pin or block work to measurements. Cover with a damp cloth leaving cloth to dry.
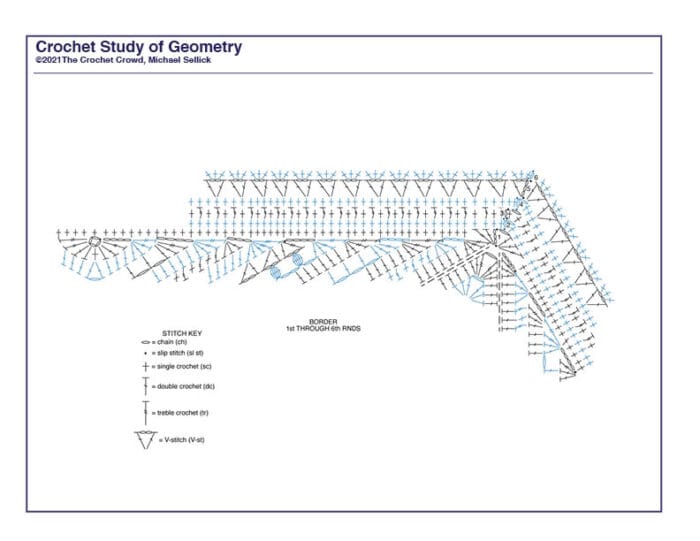
Border of Blanket
Notes
- When counting first rnd, the middle of the triangle (ch 4 that forms the ring) is centre point.
- There is 50 sts between corner st and centre point. There is a total of 101 sts across long side of the Triangle.
1st rnd: With RS facing, join H with sl st to connection point between 2 triangles. Ch 3 (counts as dc). (1 dc. 1 tr) in same sp as sl st. *Work 95 sc to next corner.** (1 tr. 2 dc. Ch 1. 2 dc. 1 tr) in next connection spot where triangles meet up. Rep from * 4 times more, then from * to ** once. (1 tr. 2 dc) in same sp as first sl st. Ch 1. Join with sl st to top of ch-3. Fasten off H. 101 sts between corner ch-1 sps.
2nd rnd: Join C with sl st to corner ch-1 sp. Ch 1. 1 sc in same sp as sl st. *1 sc in each st to next corner ch-1 sp.** (1 sc. Ch 1. 1 sc) in next corner ch-1 sp. Rep from * 4 times more, then from * to ** once. 1 sc in same sp as first sl st. Ch 1. Join with sl st to first sc. Fasten off C. 103 sts between corner ch-1 sps. Turn.
3rd rnd: (WS). Join G with sl st to corner ch-1 sp. Ch 1. *(1 sc. Ch 1. 1 sc) in same sp as sl st. 1 tr in next st. **1 sc in next st. 1 tr in next st.** Rep from ** to ** to next corner ch-1 sp. Rep from * 5 times more. Join with sl st to first sc. 105 sts between corner ch-1 sps. Fasten off G. Turn.
4th rnd: (RS). Join D with sl st to corner ch-1 sp. Ch 1. 1 sc in same sp as sl st. *1 sc in each st to next corner ch-1 sp.** (1 sc. Ch 1. 1 sc) in next corner ch-1 sp. Rep from * 4 times more, then rep * to ** once more. 1 sc in same sp as first sl st. Ch 1. Join with sl st to first sc. Fasten off D. 107 sts between corner ch-1 sps.
5th rnd: Join F with sl st to corner ch-1 sp. Ch 5 (counts as 1 dc and ch-2). 1 dc in same sp as sl st. *(Skip next 2 sts. V-st in next st) 35 times.** (2 V-sts in next corner). Rep from * 4 times more, then from * to ** once. V-st in same sp as first sl st. Join with sl st to 3rd chain of ch-5. Fasten off F. 37 V-sts across one side.
6th rnd: Join A with sl st to any ch-2 sp. Ch 1. 3 sc in same sp as sl st. *3 sc in next ch-2 sp. Rep from * around. Join with sl st to first sc. Fasten off.
Final Border Diagram
Click diagram to save or print.

Yarn Usage
Contrast A - Light Grey (0341) - 1 ball or 306 m/335 yds
Contrast B - Real Teal (0656) - 1 ball or 318 m/348 yds
Contrast C - Lemon (0235) - 1 ball or 270 m/295 yds
Contrast D - Soft Navy (0387) - 1 ball or 234 m/256 yds
Contrast E - Soft White (0316) - 1 ball or 298 m/326 yds
Contrast F - Spring Green (0672) - 1 ball or 209 m/228 yds
Contrast G - Shocking Pink (0718) - 1 ball or 226 m/247 yds
Contrast H - Jade (3862) - 1 ball or 258 m/285 yds
The Colours Used in Tutorial

I used Caron Simply Soft during the teaching in the tutorial. Therefore, I reduced my hook to 5 mm / H/8 size. I used scrap yarn I had but here is the colour breakdown.
Contrast A - Persimmon - 2 Balls
Contrast B - Gold - 2 Balls. (I used Sunshine for the Border of the entire diamond as I ran out of gold.)
Contrast C - Ocean - 1 Ball
Contrast D - Robin's Egg - 1 Ball
Contrast E - White - 2 Balls
Contrast F - Sage - 1 Ball
Contrast G - Plume Wine - 1 Ball
Contrast H - Dark Sage - 1 Ball
More Free Patterns
- How Many Yards in Average Projects
- Crochet Happy Holiday Throw Pattern
- Christmas Stitch Along: Study of The Journey
Introduction
Summer Stitch Along Timeline
- Friday, July 2nd to end: Sign Up for the Free Patterns
- Friday, July 23rd Week 1
- Friday, July 30th Week 2
- Friday, August 6th Week 3
- Friday, August 13th Week 4
- Friday, August 20th, Week 5
Hint
Pathways and Gardens are the hints for this. Smell the flowers, follow along the established pathways. There are no flowers to sew on but that doesn't mean you won't see flowers. There isn't anything in our video or pattern collection that looks like this. I pushed and did the math to make it work!
Finally, the name of the blanket was affectionately named by Jeanne. I was doing a lot of math trying to get the corners not to pucker! It's like the geometry wasn't working. In the end, the geometry was solved. Therefore a lesson in geometry!
More Ideas
- Crochet The Study of Texture Blanket Pattern
- Crochet PinPoint Granny Afghan Pattern
- 2016 - 3 Crochet Stitch Along Patterns
- 2015 - 2 Crochet Crowd Stitch Alongs
Tutorial
Week 1
Week 2
Week 3
Week 4
Week 5 - Final
Giveaway General Guidelines - ENTRIES CLOSED
- There is no sign-up required to participate. Complete the project and email your photo when you are done. This challenge is open to all Crochet Crowd Community Members.
- You may use any yarn you wish. You may create any colour scheme. Use as many or as few colours as you prefer.
- You may do as many projects as you wish. If multiple entries are identical, a picture showing the projects together to prove there are multiple must be included with your submissions.
- We require your photo to show the entire project so we know the entire project is done. Ensure your project is completely finished with yarn tails and etc not showing. It’s like giving it out as a gift, we want to see the photo showing as if you were gifting us the finished product. This way we know you are completely done.
If you are changing your hook size or yarn, we are still looking for the pattern to be the same.
You are allowed to enhance your border once all of the 6 diamonds and 6 triangles are assembled. If you see other ways to make the border pop, by all means, go for it.
- All photos must be submitted during the challenge time frame only. Entries after this due date will be accepted for our gallery but there are no prize giveaways after the deadline.
- Your Choice: Post your finished project on The Crochet Crowd Facebook Page to show everyone your finished work so we can drool over your creativity.
- When you email your finished photo to us, we respect your privacy and will only post your first and last name on the picture in our gallery with the photo so we can identify the winner at the end.
- Featuring on Facebook is dependent on you. We do not upload your emailed photos to Facebook. You have to do that yourself if you want to Show N Tell your creativity.
- We are not responsible for undelivered email and/or late entries to qualify for the prize.
- Due to the countless technology platforms and services, we are not responsible for any of our challengers if mobile devices or technology that isn’t compliant to being able to read our website, view our videos and/or get access to the free patterns.
- All applicable federal, state and local laws and regulations apply. Void where prohibited or restricted by law.
- Please verify your entry is in our gallery prior to our draw. We need up to 4 days to get your entry into our gallery. We upload it ourselves as part of our review process. If you do not see your entry, we most likely haven’t received your email. Do not wait until after the draw to check if your entry is in.
This is intended for a fun community challenge only. We each are deserving of the highest praise possible for our own creativity. Let’s have fun.

How to Submit - ENTRIES CLOSED
Please read the guidelines below to understand what we are looking for.
Send your photo to us through email at [email protected]
- Use Subject Line: Summer Stitch Along
- In the email leave us the following information.
- Your Full Name
- Your Mailing Address
- We will not be adding your name or email to our database.
We are accepting entries from August 19th to September 30th, 2021 at 11:00 pm AST.
- We will email you if something is questioned in your photo.
- You will not hear from us if your email didn’t get to us. So if you don’t see your entry after 4 days of submission, it means we haven’t received it.
mary morris says
when will you post the winners of the gifts for the Study of Geometry?
Thanks mary
Mikey says
I have to do this... but yes, I will post on Facebook once the draw is made. I have to buy boxes from Home Depot so I can prepare the shipments. Sorry for my delay.
mary says
just wanted to know, no rush, my first cal, I enjoyed it, I will watch facebook. Have a happy good day.
Mary
Miss Julie says
I want to attempt this diamond pattern as follows BUT want to make it larger in order to create a rectangle childs blanket something like 36x46 or 36x50 No set measurements. My question is what stitch do you recommend in order to complete such a task? Thank you in advance
Mikey says
You can use any stitches but be mindful the repeating of the how the pointed corners are done and how the middle corners are done need to be consistent. I found changing anything beyond Double Crochet it would buckle. I tried three times in this design with severe frustration over the buckling as it get very real once you get bigger. I think the secret is maintaining the corners as is and keeping the stitch heights consistent in growth.